This project focused on making advanced mask selections. To bring in the the clouds I placed embedded the image on to the background. Next I created a layer mask and uncovered the background from the clouds. Next I opened the girl with the umbrella and used the quick selection tool to select her. Following that, I created a layer mask and used the brush tool to get closer around her edges. I copied and pasted her into the beach scene and added a drop shadow since the background was now a sunny day. I also used the dodge tool to lighten up the houses and the sand.
The sky and the beach were two different images. First I place embeded the cloudy sky on to the scene. Next I created a layer mask and used the brush tool to erase the sky from the beach scene.
In order to create this, I used a layer mask. By making the brush larger I was able to erase the fruit from Mr. Job’s face and create a fading look between his forehead and fruit.
The file opened up with this puppy and a pair of wings on to the background image as well. In order to cut the wings, I created a layer mask and selected one side of the wing. I traced out the wing, copy and pasted the selection and adjusted the size to fit on to the dogs ears. To add the other ear I copied the entire layer and horizontally flipped the wing. Finally I used the dodge tool to blend the ears into the fur more.
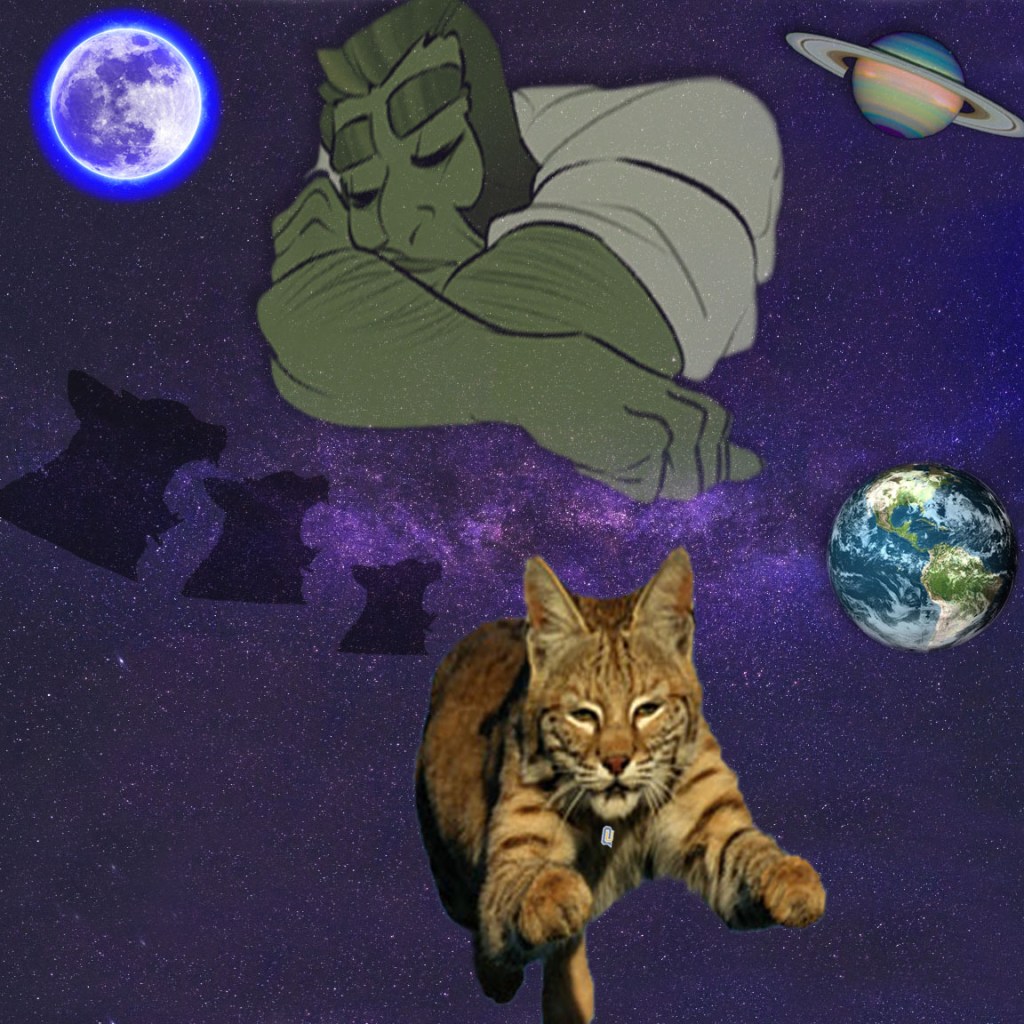
To begin, I found a space background and adjusted the image by changing its size to a 12×12, 150 ppi and RGB. To fill in the white on the bottom and the top of the image, I used the clone stamp. In order to select the images, I either used the elliptical marquee to achieve the perfect circle cut out or the quick selection tool. Next I selected a mask to adjust the edges with feathering, contrast, and shift edge. To add the cut outs to the background I copied and pasted the images and played around with their placement and transformation. Following that depending on the image, I adjusted the hue and saturation, perspective, and for some and added a drop shadow. My inspiration for this came from the legend of the bobcat with sleeping giant. For one of my images I wanted to make it seem as if the sleeping giant was looking down at the bobcat heading to QU. I hoped to set the mood with the glowing moon, and the silhouette of the bobcat in the moon as well. In my other creation I wanted to make it seem as if the solar system was surrounding around the bobcat named QU and the sleeping giant looking down on Qu. I used the starry night background in hopes to eliminate some of the negative space. The sky is the limit for us students here at Quinnipiac.
This beach scene started off just as a blue sky background, with a grassy beach scene. First I used the clone stamping tool to extend the sky and sand over the white border at the top and the bottom of the image. Next, I place embedded the image of a cloudy sky and rasterized. After creating a mask I was able to create more of a fluid motion between the sky and the grass. To add in the birds, I used the magic wand and then went back in on the feathers using the lasso tool to get all the details for a more textured look. Then, I selected a black mask background to adjust the smoothness, edges and feathering of the image. I then repeated that process with the shells, beach ball, flower, and blankets. For the flower, I changed the perspective to add the effect of the flower laying on the blanket, rather than just pasted on. Finally I placed the objects in the according places and added a drop shadow.
I began by choosing 3 landscape images and imported them to photoshop. I cropped each image to fit the 12×4 inch canvas size, then rasterized each photo so I could crop each image. First I adjusted the hue and saturation to each of the images along with contrast and brightness. In the sunset image I added the ripple filter. For the middle image of fall foliage , I added the watercolor filter along with the other color adjustments. Finally I sharpened the waterfall image and adjusted the hue and saturation to make the water have a purply enchanted look with the structure beside it.
Hi! My name is Sydney Santoemma, and I am from North Haven, Connecticut. At North Haven High I was enrolled in 3 years of photography including 1 year of AP Photography, in which my portfolio received a 5. I am starting my freshman year at Quinnipiac University. My major is currently communications undecided. I am very excited to grow and experience QU!
My favorite season is summer because I love to spend time with my family at our lake house in East Haddam, CT. During high school I worked at a pizza restaurant, Giovannis in Northford, CT, resulting in my favorite food to be pizza.
This photo once started out at 3 separate photos. First, the images were opened up in photoshop. Next, the pixel sizes were all changed to 150. After, they were layered on top of each other and used canvas size to fix the measurements. Following that, the photographs were transformed and spaced out with a .25 inch on every side, cropped the excess, and filled the white background with a peach tone. Then, the drop shadow effect was added on to each of the photos. This image was concluded by adjusting the size and turning the psd file into a jpeg.


